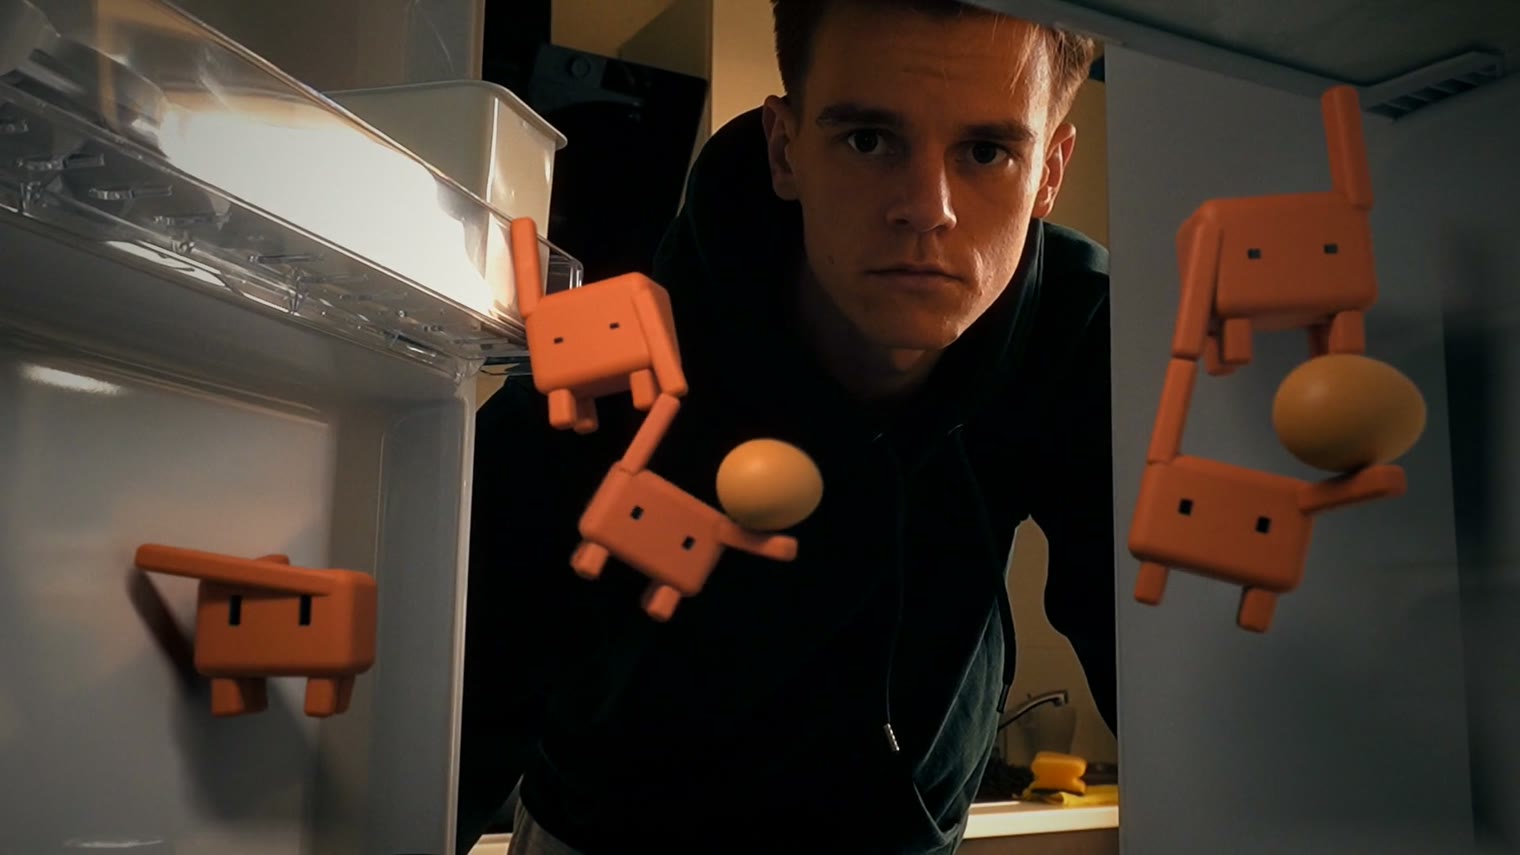
The Full Breakdown - Tiny 3D Characters in Real Footage
Everything used in that shot: the skill file I gave Claude Code, the exact prompt, and the follow-ups that fixed what looked fake.
I never opened Blender's 3D window. Claude Code wrote and ran every script: the camera solve, the lights, the characters, the physics, the render and the composite. You can put any character or any product into your own footage the same way.
Try it here → Claude Code + Blender
One real clip, one skill file and one prompt. The footage gives the camera, the light and the motion. Claude Code rebuilds all of it in 3D and makes the characters obey it.
The pipeline in one look
| Step | Tool | What it gives you |
|---|---|---|
| 1 | Your camera | The plate: real light and real motion. Everything the CG has to obey. |
| 2 | Claude Code | A skill file that turns Claude Code into a VFX artist that works in Blender by script. |
| 3 | Claude Code + Blender | The camera and the moving parts solved, the scene lit like the plate, the characters animated with physics. |
| 4 | You | Three approvals: the look on stills, the motion on a quick preview, then the final render. |
| 5 | Claude Code + ffmpeg | The CG composited onto the footage and graded with the rest of the video. |
The camera is real, so the CG has to obey it.
CG looks fake when it follows the artist's imagination: its own light, its own perspective, its own physics. Here every number comes from the footage: the lens, the angle of the door on every frame, the brightness of the fridge lamp. Match the plate, not your idea of it.
Step 1: Shoot the plate
The plate is the real clip the characters go into. How you shoot it decides how real the result can look.
| Camera | Size |
|---|---|
| Any camera or phone, set down so it doesn't move | 1920×1080, 25 fps |
What matters here:
- Keep the camera still. No tripod needed: I just put my camera inside the fridge, on a shelf. A camera that doesn't move needs no tracking at all. Handheld works too, but every pixel of shake has to be solved.
- Give the CG something to react to. A door that opens, a lid, a drawer. When the characters swing because the real door moved, the brain stops questioning them.
- Real, motivated light. A lamp, a window, a fridge light. It gives the CG a clear direction and colour to copy.
- Something of known size in the frame. A tile, a shelf, a bottle. It sets the scale of the whole 3D scene.
- Leave room. Empty space on the surfaces where the characters will be, and a second or two of extra footage on both ends.
Step 2: The skill file
A skill is a rules file Claude Code reads before it works. This one holds everything I learned putting CG into real footage: how to solve the camera, light the scene, keep objects from passing through each other, and composite the result.
Save it in your project as .claude/skills/cg-in-footage/SKILL.md. Claude Code picks it up on its own.
The skill:
---
name: cg-in-footage
description: >
  Put a 3D character, mascot or product into real video footage with Blender, fully by script: read the
  plate, solve the camera (and anything that moves in it), match the light, build or import the asset,
  animate it with real physics, check every frame for intersections, render with a shadow-catcher pass,
  composite and colour-grade it like the plate. Use for "add a 3D character / product to my clip",
  "make it look real", "match the light", "make it interact with the scene".
---

# CG in live footage — Blender (free), driven entirely by Python scripts

Run Blender headless: `blender --background --python scene.py -- [args]`. Use Blender's bundled
Python (it has numpy) for any analysis script. Never edit anything by hand in the UI: every step is
a script you can re-run with new arguments.

## 0. Ask before starting
- The clip (path), which seconds of it, and the frame rate.
- What to add: a character, a product, a mascot — and its real-world size.
- The action, the duration, and the personality / mood of the animation.
- How the final will be graded (so CG and plate share one colour pipeline).

## 1. Read the plate
- Probe it (resolution, fps, codec, HDR). Extract full-resolution stills of key frames and LOOK at them.
- Static or handheld? Phase-correlate a few textured patches across frames:
  all ~0 px → static (a tripod, or the camera just set down on a shelf / table) — no camera track needed. Otherwise track the ground plane (patch phase correlation +
  RANSAC homography) and warp the CG layer per frame in the composite; keep the Blender camera static.
- Anything in the shot that MOVES and that your CG touches (a door, a drawer, a lid, a car door):
  NCC-track 6–8 high-contrast points on it through the whole shot, then solve it as a rigid body
  (e.g. a rotation about a hinge: unknowns = focal, camera pitch/roll, hinge position, point positions,
  a smooth spline for the angle; Levenberg–Marquardt + Huber weights, several starts). Aim for a median
  reprojection error of a few pixels and draw the solved points over the plate to prove it.

## 2. Solve the camera (no tracker needed)
- Find straight edges (tiles, shelves, door frames, table edges); refine each by the gradient peak across
  it; least-squares vanishing points.
- Pitch and roll from the verticals; focal length from two orthogonal vanishing points
  (f² = −(v1−c)·(v2−c)). Far vanishing points are fragile — cross-check and keep the estimates that agree.
- Scale from one object of known size in the shot (a tile, a bottle, a pen), then sanity-check it with
  a second object. If focal and scale stay ambiguous, pick the solution whose implied sizes are plausible.
- Verify: project known 3D points through the Blender camera and compare with the plate (≤ 2–3 px).

## 3. Build the scene around the plate
- Every surface the CG touches gets a proxy: a SHADOW CATCHER (with the plate projected on it from the
  camera, so bounce light has the right colour). Proxies of moving parts are parented to the solved motion.
- What's behind the action: a camera-invisible plane textured with the plate, as an emitter → correct
  reflections and rim light.
- Lights from the evidence: shadow directions, which side of real objects is brighter, practical lamps.
  One big area light = soft window light; small warm/cool sources for practicals; world for ambient.
- CALIBRATE the light: render a grey card (known albedo) on a proxy surface and compare its pixel values
  with the plate at the same spot; scale the lights until they match. A first guess is usually far too
  bright — that is what makes CG look plastic.
- If the plate's light level changes (a lamp switches on/off, auto-exposure), measure it per frame on a
  static surface and key the CG lights to that curve.
- A surface very close to the lens (a few cm) can't hold real-size objects: place them on that surface's
  line of sight at a normal distance, render them on their OWN view layer and composite it on top
  (correct occlusion order); a static camera has no parallax to give the cheat away.

## 4. Assets
- Prefer real scans: Poly Haven (CC0, API: https://api.polyhaven.com/assets?t=models, files via
  /files/<id>; download glTF, not .blend). Real textures: ambientCG (CC0, API at ambientcg.com/api/v2).
- Or photoreal from primitives — objects that are simple shapes in reality (an egg, a ball, a cup, a box):
  correct proportions, a subtle surface bump (pores / grain), colour variation, faint speckles, a touch of
  subsurface scattering, varied roughness.
- Match colour by measurement: mask the same kind of real object in the plate, compare mean linear RGB,
  copy the channel ratios exactly.
- Stylised characters / products still need real materials: colour drift, roughness variation, smudges,
  micro bump (orange peel), edge wear from curvature, cavity darkening, dust specks, a little SSS. A clean
  flat material reads as "a cheap gif".
- Props in a character's hands: model them to be held — the hand / paw grips them, they rest on the arm
  against the body, they have weight. Never a prop floating at the tip of a limb.

## 5. Animate
- Personality first: write 3–5 beats (anticipation → action → reaction → hold). Squash & stretch with the
  pivot at the base, eyes that react (squint on impacts, slow blink), never a static pose.
- Real physics where it shows: things that hang swing as a damped (double) pendulum driven by the real
  motion of their pivot; things that fall settle deterministically onto the surface (keep the lowest vertex
  on it); impacts land on solved angles (bisection on the prop's lowest point vs the surface), not guesses.
- Readability: keep the action's plane ~45° to the camera, keep the prop on the camera side, make props a
  bit bigger than life at toy scale. Small figures swing fast — soften gravity so the motion reads.
- Lay out by search, not by eye: grid-search position / rotation / distance so the real mesh footprint
  stays inside the surface it stands on.
- Key everything in world space, every frame, when it rides on a solved moving object.

## 6. Hard rules (check them in code, every run)
- NOTHING inside anything: a per-frame BVH overlap test (mathutils.bvhtree) of every character part ×
  every prop × every proxy surface × each other. The script must print `INTERSECTIONS: 0` before any render.
- Contact is real: feet / hands touch their surfaces (gap ≤ 1 mm), nothing below a surface it stands on.
- Cut / broken objects: cut perpendicular to the object's own axis, close the cut with a real cross-section
  material, pieces fly AWAY from the blade, seams shut at rest.

## 7. Render
- Cycles (GPU), Standard view transform, film transparent, motion blur (180° shutter), depth of field to
  match the plate's softness.
- Shadow Catcher pass ON. A File Output node writes per frame: `obj_####.png` (RGBA 16-bit) and
  `shadow_####.png`.
- Look-dev fast: render only a region (`border`) of the frames that matter.
- Close other GPU-hungry apps (transcription tools, games, browsers playing video) — they can make each frame 3× slower.

## 8. Composite + grade
- Blender PNG alpha is STRAIGHT → premultiply before compositing (or you get bright fringes).
- Plate × clamp(shadow pass, 0…1) (shadows only darken, feathered at the frame edge), then the CG over it,
  a 0.7–0.9 px blur and grain matched to the plate.
- Composite on the UNGRADED plate, then grade the result with the same settings as the rest of the edit.
- Judge colours after the grade, by measurement against the reference, not on the raw render.

## 9. Approval gates (always)
1. STILLS: 2–4 key frames, full quality, composited + graded → wait for an OK on the look.
2. PREVIEW: every frame at low samples (≈12) → composite → grade → into the edit → wait for an OK on the motion.
3. FINAL: 48–64 samples, then composite + grade + swap it into the edit.
Report what you checked (numbers, frames); never claim you watched or listened.
What matters here:
- Scripts only. Every step is a Python script Blender runs in the background. Any fix is a new argument and a re-run, never a manual tweak you can't repeat.
- Measure, don't guess. The lens, the scale, the light level and the colours are all measured from the footage, and the light is calibrated on a grey card against the plate.
- Physics from the real motion. Whatever hangs swings as a pendulum driven by the real door, so the swing matches the shot.
- Nothing inside anything. A check runs on every frame and must print INTERSECTIONS: 0 before anything is rendered.
- Works for any product. A mascot, a toy, a bottle, a sneaker. Change the asset, the rules stay the same.
Step 3: The prompt
One prompt describes the clip, what to add and how we work. Fill the brackets with your own shot.
| Tool | Output |
|---|---|
| Claude Code + Blender (Cycles) | 1920×1080, 88 frames |
The prompt:
You are my VFX artist. Use the cg-in-footage skill. Work only with scripts (Blender in background mode + Python), never by hand.

THE CLIP
- File: [path/to/clip.mp4], use [0.0]–[3.5] s, [25] fps. The camera is [set down and still / on a tripod / handheld].
- What's in it: [one sentence, e.g. "POV from inside a fridge: the door opens, I look in, I close it"].
- Moving parts the CG must ride on: [e.g. "the fridge door and its shelves" / none].

WHAT TO ADD
- [Number] × [character / product / mascot], about [7] cm tall, look: [shape, colour, material, e.g. "a blocky terracotta vinyl toy with two black eye slots, four short legs and long leg-like arms"].
- Where and doing what:
  1. [Character A] [action, e.g. "hangs from the top door shelf by one hand and holds character B with the other"].
  2. [Character B] [action, e.g. "dangles below, swinging, carrying an egg against its side"].
  3. [Character C] [action, e.g. "climbs the inner wall of the door, glances back at the camera once"].
- Props: [e.g. "a real-looking brown egg"]. If a prop can't be made photoreal, tell me and suggest one that can.
- Personality: [e.g. "mischievous, a little clumsy, like cartoon minions"].

HOW IT MUST LOOK
- Exactly like the plate: same camera, same light direction, colour and brightness, same softness, grain and motion blur.
- Everything that hangs or moves follows real physics driven by the real motion in the clip.
- Nothing may intersect anything, ever. Contacts must really touch.
- If the light in the plate changes (a lamp turns off, exposure shifts), the CG light follows it.

HOW WE WORK
1. Analyse the plate: static or handheld, the camera solve, the motion solve of every moving part. Show me the solved points drawn over the plate and the error in pixels.
2. Build the scene: proxies + shadow catchers, lights calibrated on a known surface in the plate.
3. Build the assets and the animation. Run the per-frame intersection check until it prints INTERSECTIONS: 0.
4. Render 3–4 key STILLS at full quality, composite them on the plate, grade them like the rest of my video ([grade / LUT / "none"]), and STOP for my OK.
5. After my OK: a low-sample PREVIEW of every frame, composited + graded, put into my edit. STOP for my OK.
6. After my OK: the FINAL render (64 samples), composite, grade, swap it into the edit.

At every step tell me what you checked and the numbers. Don't say you watched it — I'll judge the motion.
What matters here:
- Describe the motion in the shot. Name every moving part the characters touch. Claude Code tracks it and solves its motion before building anything.
- Give the real size. A 7 cm toy and a 30 cm toy move and swing completely differently.
- Write the action as beats. One line per character: where it is and what it does. Add a personality so the animation has attitude.
- Ask for proof, not promises. The solved points drawn over the plate, the error in pixels, the intersection count.
- Build in the stops. Stills, then a preview, then the final. A final render takes hours, a still takes a minute.
Step 4: Approve the look, then the motion
You review at three gates: full-quality stills for the look, a low-sample preview for the motion, then the final render. When something looks off, the fix is one short message. These are the follow-ups I actually used.
When it looks like plastic:
It still looks like CG — too clean and too bright. Calibrate the light again: put a grey card (albedo 0.8) on [the surface next to the characters], compare its rendered pixel values with the plate at the same spot and scale the lights until they match. Then add real imperfections to the materials: colour drift, roughness variation, smudges, a micro bump, edge wear and cavity darkening. Show me the same stills again.
When something passes through something:
At about [1.2 s] [character A]'s [arm] goes inside [the shelf / character B]. Add that pair to the per-frame intersection check, fix the layout or the animation, and don't render anything until the check prints INTERSECTIONS: 0.
When the prop looks fake:
The thing in its hands looks fake. Replace it with an object that can look photoreal from simple shapes (an egg, a ball, a cup), match its colour to real objects in the plate, and make the character really hold it: resting on the arm against the body, with weight — not stuck to the tip of a limb.
When you want characters right next to the lens:
Add two more characters hanging from [the shelf in the top-right corner], same size as the others. That shelf is very close to the lens, so put them on its line of sight at a normal distance, render them on their own layer and composite that layer on top of everything. Same physics, same light, nothing intersecting.
When the render is slow:
The render is too slow. Check which other apps are using the GPU and tell me what to close, render only the region of the frame where the characters are, and keep the low-sample preview for checking the motion.
What matters here:
- Judge stills, not ideas. The look is decided on real frames composited on the footage and graded, before a single minute of animation is rendered.
- Point at a moment. "At 1.2 s the arm goes into the shelf" gets fixed in one go. "It looks weird" doesn't.
- Props that can be real. An egg is a simple shape that renders photoreal. A sliced fruit at toy scale didn't.
- Close the GPU hogs. A background transcription app made every frame about three times slower.
Step 5: Composite, grade and sound
Claude Code puts the render on the untouched footage and runs the whole video through one colour grade, so the CG and the plate get the exact same treatment.
What matters here:
- Shadows are a separate pass. They only darken the real footage, so the characters sit on the real surfaces.
- Grade after compositing. Grading the plate first and the CG separately is how CG ends up a different colour.
- Grain and softness. A touch of blur and film grain on the CG, matched to the plate. Perfectly sharp pixels give it away.
- Real recorded sounds. The fridge door, the hum and the voices are stock recordings, timed to the frames. Generated sounds felt fake next to real footage.
Recap
- Set the camera down somewhere it won't move and film a clip with real light and something that moves.
- Give Claude Code the skill file so it works like a VFX artist in Blender, by script.
- Run the prompt: the camera, the motion, the light and the characters, all measured from your footage.
- Approve stills, then a preview, then the final render.
- Composite and grade everything together, add real sounds.
And once more: the camera is real, so the CG has to obey it.
Follow me on Instagram to see more content like this.